How to Add Depth with a Collage Layer
sign up for my free minicourse “kickstart your abstract painting”
TRANSCRIPT:
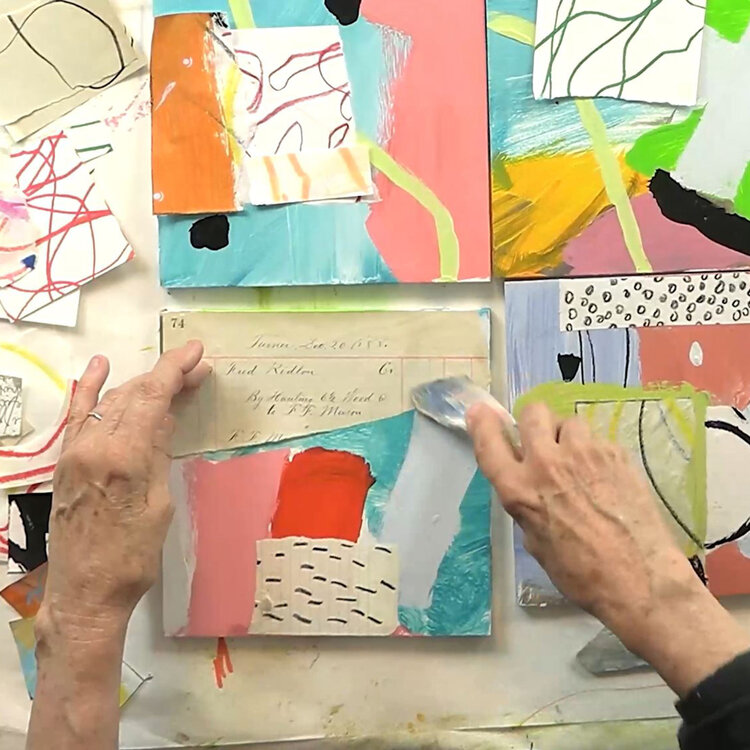
Hi, it’s Adele. And in this video, I’m going to show you one of the layers, it’s a very important layer, of what I do to add a lot of depth in all my paintings. And that is a collage layer, which I add after that some paint and markings and all kind of things. But I’m going to show you, these are four separate different paintings, but I’ve put them all together like one, and I’m working on them like one because then I’m going to take them apart. So watch until the end so you can see what the end result looks like each one of these individually.
So, okay. Let’s get started. Now, I typically put out around me several ideas of possibilities that I think I’m going to do with the colors or whatever I have right in front of me. So with that in mind, I’m going to just experiment, take something, put it over here, see if it’s a yes or a no. I kind like that. I don’t glue anything just yet, because I want to make sure … I might use it in something else.
Now these are bright and the goal for this one, this series, or for this stage, is to quiet them down with collage. So I’m trying to see … Oh, I like that, so I’m going to put that there. I could already tell, really quickly, that’s what I’m going to do. So what do I want to do for these other ones? Let’s see, let’s see. Eye, to quiet down.
Here’s some yellow. Oh, I kind of like this. See, and I like to put the … I typically put lines where they might intersect and go around the other one. Instead of having it up here where the eye just ends, having it down here where your eye will continue. So I like this and this, and I just go one, one, one, one all the way around. See if I can find something.
So let me see if I can find something for these two. Here are all kinds of different colorful things. Oh, here’s a green so maybe … This is just a … That’s pretty big, so how about if I did something maybe over here? No. Oh, I kind of like that up there. That’s a maybe, I like that orange in there, I don’t want to take that away, but, huh, not in the middle. Well, for right now, I’m just going to leave that because I like it, and I like the bigger one, I like bigger things. So I’m going to put that there.
Let’s see what else I have going on. I saved these large papers that I cut things out of, just in case I want to use it for this exact purpose. And for this one, I think I’m going to cut it. Because I love the black and white, but I also love this red shape. I love this red shape, so let’s see. Let’s see where that might go. Okay, let me put this over here.
And you just try, it’s trial and error. That’s what everything is, trial and error. And just think, do you like it? If you don’t, then don’t put. It if you do, okay. No, this already has a lot of red so I’m thinking no on there. This has a good one, but I don’t want this whole thing so I’m going to tear this up. Should I do this? Do I like that? Okay, I love this, but I haven’t found the right place for it yet. So I’m going to put this aside, but it is in one of the top of the piles for me.
So maybe this yellow, I have this yellow. So maybe this yellow, let’s see. And I like using big shapes, so this is a big shape, I did this over here. Should I do this down here or put something else on top of this red? Huh, I still like this. Again, I’m going to put it over here. Let me see, let me see. Oh, I have a couple other things over here. Maybe something like that. I know it’s not quieter, but it’s it breaks up … What I’m looking to do is break up this. I love some of this, but I don’t want to have the whole thing.
Now should I want it like that on the side, so it kind of frames it on the side? I like that. Okay. So, so far, this is how I like it. Let’s see what else. And I can substitute something. Let’s see, let’s see. And I’m just throwing these down. Do I want to put something over there on top of this? No. Let’s see over here. And I just hold it on top and decide on something. I might want something down in this area. I love this blue, but I’m not sure about that.
So let’s go back to some of these just quieter pieces, just like that. Let’s see. That’s kind of big. What about something like this? And what if we did something like … Oh wait, wait, wait, I got an idea. This is very neutral. It’s a painted square, but it’s got lots of dimension to it. So I might do something like this. No, no, no. You have to [inaudible 00:05:38] like, “Ooh, I love that.”
And what I might do with this is I might go ahead and draw on it with a black … Just put some marks on it and see if that adds anything to it. Well, we’ve got this and this, so that’s not going to work. We’ve got that, I love these … Maybe this needs a little bit of the black, but that has scribbles already. Let’s keep moving on, moving on. Nope. This, I like this here. Here, here. And I like it here because I like this blue, I like the green line coming through. So, so far I’ve got this one, this two, this and this.
Let me see if there’s anything else I want to add in here, just in case. I like this here. And I’m going to pull this over just a little bit to see if I want to see the green. Look at the difference if you just pull it here or here. I kind of like it here because you see this on this side too. So now I know I want this and this, so I am going to glue them on.
And so I’m going to glue it with … This is thin paper so I can take my medium and go ahead and glue that on. Let’s see, so I do this. And this is about a layering effect. So you add on and you can cover up, and you add on and cover up. So I’m going to put this right here. I wanted to see it at the bottom, I wanted to see a little bit of that green. So that looks like it’s the trick. Okay. And I’m going from the center out because that’s the best way to go ahead and do it. And then I’m going to go over it with the gloss medium. So there’s that.
Now I’m going to do this one. Now this one is a little thicker. So I’m going to take some gloss gel, not medium, but gel, because if you have thicker paper, then put the thicker … Thicker paper equals thicker and heavier gel. Okay, so I’m going to get rid of some of these things. You see how all of the things I’m going to get rid of? That’s okay. And you know what? I’m going to leave this line here. Okay, I’m going to leave that line.
Okay, and let’s see, I’m going to … Oh, let’s see there. Okay. Now I’m going to push that down. Okay. Try to get all the … If you do it from the center out, you’ll be able to get all the wrinkles out, and then I’ll just go over it with this. So more of that gel. Okay, so we have these two. That’s so nice. Now what? Oh yeah, I was thinking about something else in here, but not right now.
Okay. So we’ve got this and this. Oh yeah. This and this. Oh, here’s a little bubble so I’m going to take that out. Okay. Now these two, this I’m not sure about. Actually, you know what? I wonder if it’s something like this? I’m going to put this here because I really like this, so I’m going to do that. This is thin, but I have the medium right here so I’m going to do that. I mean the gloss gel, so I’m going to do that. Okay. So that’s going to go on there. And look, they have a little bit of this yellow here.
All right. All right, now let’s put this on the side and stick this in here. And I almost forgot, here’s something. This is an acrylic skin. And what it is, is … Well, there’s a lot to learn about acrylic skin. So you would have to go learn, take a class, or I do have an Art with Adele membership that has … It’s a school, and it has so many things. It’s like going to art school. So you might want to take a look. I’m going to have the link below. I have several … I have a video on how to make these skins and so much more, so go ahead and take a look.
Now let’s see if I want to put this somewhere. The acrylic skins, which you’ll learn, are very bendable. There, there, I like it here. I like it up here, overlapping here. So that’s what I’m going to do. And I can put it down on top of this one, because I just had put the gloss, the gel on top of this neutral piece. So I’m going to push that down and I just need to add some there. Let me get my brush out.
So you see how the layering, one on top of another. And if you use gloss rather than matte gel and medium, you can see straight through it. Even though it looks white, it dries clear. So let’s see. Let me show you something. Let’s do this. Oh, these acrylic skins you would love. Okay, so we’ve got this, we’ve got this. I need something with this one. I kind of like this here, or do I like the black? Too much of the black. Do I like …
Here’s a little pop of color in here. Since I already have that, do I want something a little different? I think so. This might be the one, because … Or now do I want it here, or here, or here? Is there any place that tells you … Oh, I like it there. I’m going to do it here because it gives you a break from the blue here, but it relates to this blue on the outside. So that’s where I’m going to put it.
Okay. Let’s see. So this is where I’m going to put it, right over here. And see how you layer things? You can just put one thing on top of another, on top of another, it makes it so interesting. Oh, now I almost forgot, I still have this … One of my favorite things is this black and white tissue paper. Do I want this? I think I’m going to tear this because … I want to see the orange. So what if I did that? I like that better so I get to see the orange. So let me put that on. See, you can try things and if it ends up, you put them on and you don’t like it, just let it dry and just go over it with another piece of collage or some paint.
So I’m going to put this up here. A little off-center. I like it a little off-center because I want to see the green over here. Oh, I love that. Okay, let’s see what else we’ve got. We can do one or two more things. Oh, did one thing, one thing, a couple things. I wonder if I want to put anything here or anything here? No, I think as much as I love the black and white, I’m not going to do that.
I wonder if something like this would work? This is another skin that I got and I just … Let’s see. I cut this out and look at that, how fabulous. What a fantastic shape this is. Oh boy, I have to use this somewhere, I’m not sure where. Let’s see. Not in the middle, down here. These two are pretty good. This one needs a little bit of work, but I keep going up here. Is it over here? I think I need it over here, close to this black, so that’s where I’m going to put it. And I’m going to cut off some of the excess, which is just gloss gel that dried. Okay. So I’m going to do that. Let’s put this on. Look how many interesting things you can put on here? I knew I wanted something over there. It brings your eye over there, interesting shape.
Okay. Much improved, isn’t it? Okay. Now we’re going to do one more thing. I’ve just got to do one more thing here and then we’ll be finished. And what I might do is I might take a pen. I might not use collage, but I can maybe use one of these pens and draw something. Do I want a yellow? Do I want a white? I might do yellow. I think I might do yellow. This yellow or white, this yellow or white. I’m going to do … I’ve already got pink, green or blue. And I’m going to do just a shape, another shape. I like that. That looks great.
Okay. See, look how quick, it didn’t take long, but I really improved. Let me push all these over so you can see, I want to show you the end result for those who have waited. Look at each one. We’ve got this one, look at that. I’m going to go over here, right there. Look at that one. Look at that one. Let me put these over here, look at this one. I like all of these, they each have such a great and different personality. And I love this one.
Okay, those are the four. I hope that you enjoyed this video. Make sure you click or take a look at the link below so that you could learn more about Art with Adele. And if you haven’t already, please hit the Subscribe button because I’m always putting up new videos. Thanks for watching, and I’ll see you in the next one.
